How to Update Nameservers for a Domain?
-
 Castor
 - 14 Sep, 2023
Explore the essential process of updating nameservers, the key bridge connecting your domain to hosting, to establish a rock-solid and reliable connection for your website’s online presence.
What is Nameserver
A nameserver, or DNS server, is like a phonebook for the internet. It translates easy-to-remember website names (like shellsecrets.com) into IP addresses (18.139.194.139). When you type a web address, your device checks with a nameserver to find the right IP address and connect you to the website you want. It plays a vital role in linking your domain (web address) to your hosting (where your website’s files are stored), ensuring that when people visit your site, they’re directed to the correct place on the internet. It’s a crucial part of how the internet works, making it easier for us to navigate online.
Steps to Update Nameserver
Here are the easy steps to change nameservers and connect your domain with your hosting.
- Access Your Domain Registrar’s Website
Go to the website of the company where you registered your domain. You’ll need to log in to your account.
- Locate Domain Management
Find the domain management or domain settings section in your account dashboard. This may be labeled as Manage Domains, My Domains, or something similar.
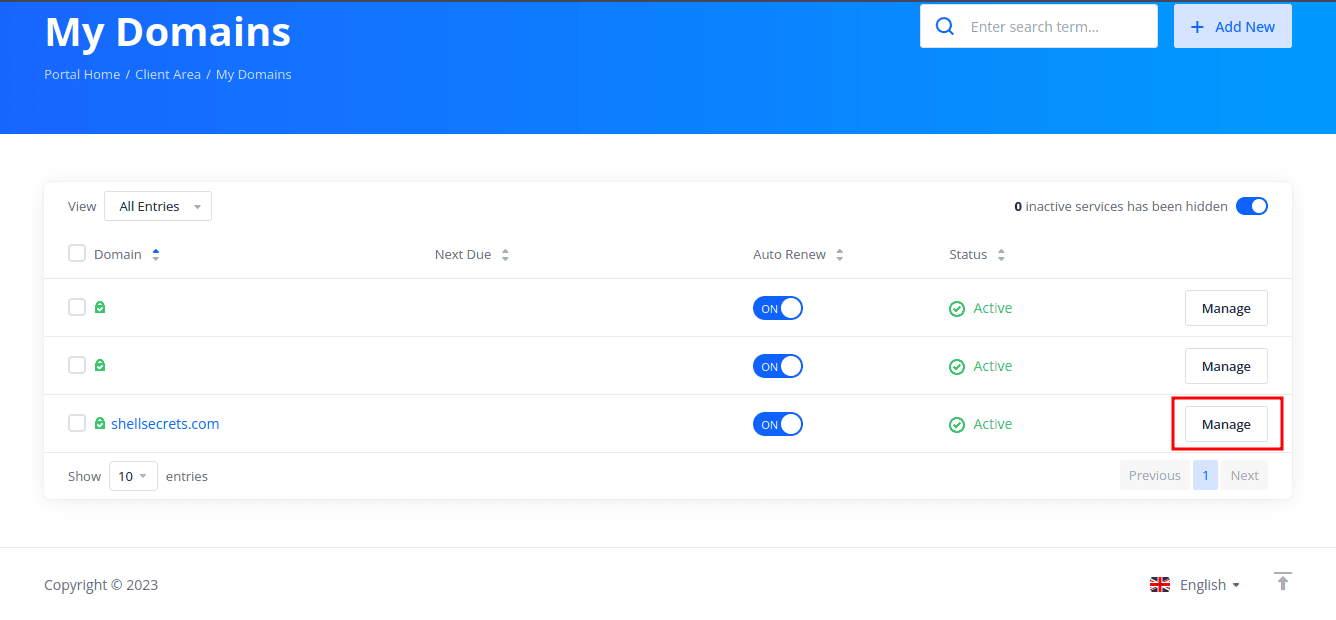
- Select the Domain
Choose the specific domain for which you want to update the nameservers. If you have multiple domains, ensure you’re working with the correct one.
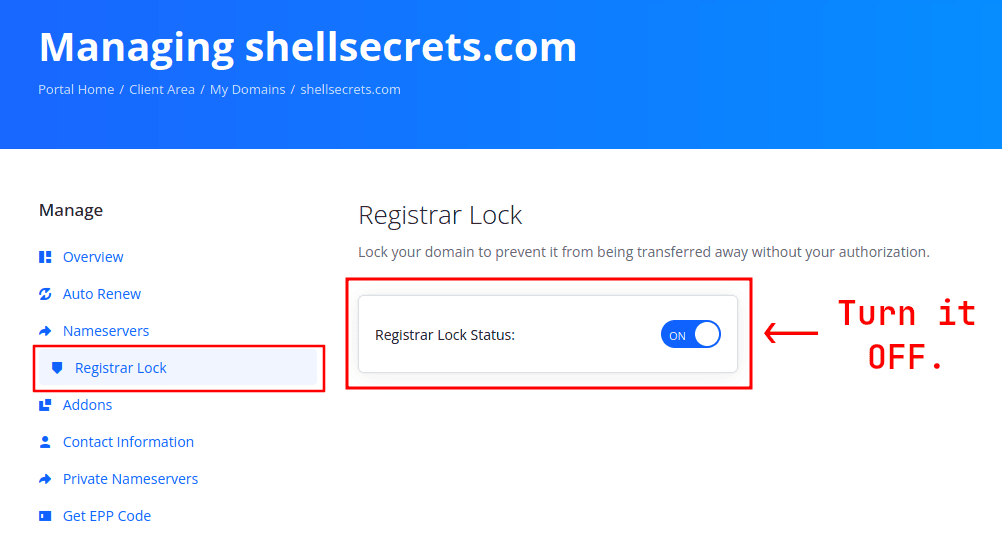
- Check Registrar Lock
In the domain management section, verify if your domain has a registrar lock (also known as domain lock or transfer lock). This lock prevents unauthorized domain transfers. If it’s enabled and you need to make changes, you may need to disable it first. If there’s an option to disable it, proceed to do so.
- Look for DNS or Nameserver Settings
Within the domain management section, you should find an option related to DNS or nameserver settings. It might be labeled DNS Management, Nameservers, or Domain Name Servers.
- Choose Custom Nameservers
Select the option to use custom or manual nameservers. This allows you to enter the new nameserver information.
- Enter the New Nameserver Information
Input the nameserver details provided by your hosting provider. Typically, you’ll need to enter at least two nameservers, and they should look something like ns1.example.com and ns2.example.com.
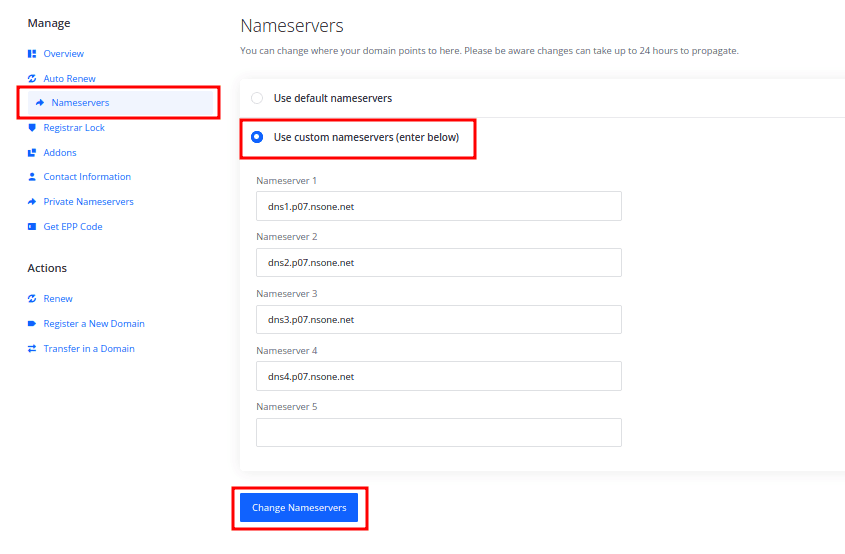
- Save Changes
After entering the new nameserver information, save your changes. This may involve clicking a Save, Update or Change Nameserver button.
- Re-enable Registrar Lock
If you disabled the registrar lock in step 4, once the nameserver changes are complete, consider re-enabling the lock for added security.
- Wait for Propagation
DNS changes can take some time to propagate across the internet. It can range from a few hours to 48 hours or more. During this period, your website may experience intermittent downtime or errors.
- Verify the Update
After some time has passed, use DNS lookup tools or online services to verify that your domain is using the updated nameservers. This ensures that the changes have propagated successfully. Popular DNS lookup websites like whois.com and dnschecker.org provide convenient tools to check the status of your nameservers.
- Test Your Website
Finally, test your website to ensure it loads correctly. Make sure all web pages, email services, and other functionalities work as expected.
Remember that DNS propagation can vary, so don’t be alarmed if your website doesn’t immediately reflect the changes. It’s essential to keep the old nameservers intact until you’re certain that the new ones are fully propagated and functioning correctly.
Important Considerations
An important consideration when updating nameservers for your domain is to ensure the accuracy of the new nameserver information provided by your hosting provider. Any errors in this data can lead to website downtime or connectivity issues. Additionally, always maintain a backup of your old nameserver information until you’re certain that the changes have fully propagated and your website is functioning correctly with the new nameservers.
Conclusion
In conclusion, updating nameservers for your domain is a fundamental step in ensuring a seamless connection to your hosting services. By following the outlined steps, including checking registrar locks, using custom nameservers, and verifying changes through DNS lookup tools, you can navigate this process with confidence. Remember, accuracy and patience are key, and always keep a backup plan in place to safeguard your online presence during this transitional period. With the right approach, you’ll maintain a robust and uninterrupted online presence, delivering a seamless experience to your website visitors.